This blog covers usage of the Google Earth Extension with AutoCAD Map 3D 2010.
Advanced techniques will be shown using the KMZ publish to do a "Round-Trip" process. Since a picture tells a thousand words, I'll start out with a couple of images showing the beginning and end of the round trip.
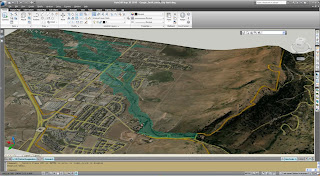
Starting With This:


End up with this:
So how did I do it? I'll answer that shortly. Before going into the steps, be aware that this blog is not intended as training. It is intended to show you capabilities of AutoCAD Map. You may have to "crack the manual" and do a little research. It will be worth it, because you will get spectacular results!

So how did I do it? I'll answer that shortly. Before going into the steps, be aware that this blog is not intended as training. It is intended to show you capabilities of AutoCAD Map. You may have to "crack the manual" and do a little research. It will be worth it, because you will get spectacular results!
NOTE: Before using the Google Earth Extension, you must first download it from Autodesk's web site at: http://labs.autodesk.com/utilities/google_earth_extension_beta/
THE PROCESS
I will publish a city boundary and flood plane then drape it onto a surface. Start the publish KMZ process from the publishKML button:

I will publish a city boundary and flood plane then drape it onto a surface. Start the publish KMZ process from the publishKML button:

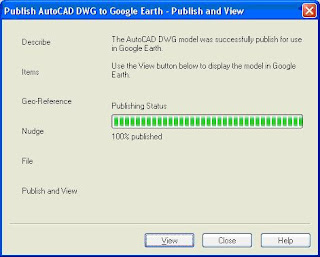
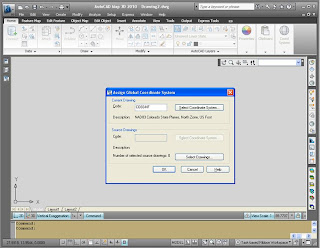
Next you will go through a series of steps specifying what to publish, coordinate transformation etc... There are six steps in this process. Only the first and last dialog boxes are shown below: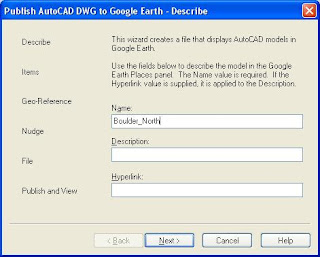


The published KMZ looks like this in Google Earth:


Now set to set the flood plane to transparent.
Right-click the flood-plane data item:

Right-click the flood-plane data item:
And set the transparency:

Importing the surface from Google Earth.
Before importing from Google Earth, you must have it open and zoom to your area of interest. You also need to make sure you are viewing in plan view. For this next step, I will be using a new empty drawing. You can use an existing project if you'd like. It is important to note that you must be working in a defined coordinate system otherwise nothing will geo-reference correctly.
New drawing, setting coordinate system:

In addition, you must also make sure to have the right units set: 

Start the ImportGEMesh command:


The imported mesh with a new material:

The aerial photography is imported as a material. The image will always be black and white. You can update it to a color image by doing the following steps.
- Close the drawing and save it.
- Use the google earth export image and overwrite the image referenced by the material (Sorry you'll have to crack the manual on this one. This is an AutoCAD skill not AutoCAD Map.)
- Re-open the drawing. It should now have the color image linked to the material.
Viewing the surface in 3D.
Display the 3d Navigation toolbar or use the ribbon to start a Constrained Orbit:
While in orbit mode, right-click and set the visual style to Realistic:
The surface will now look like:
Note that you can see the surface "grid". To turn this off, edit the Realistic visual style and change the Edge Mode to NONE:
Here are a couple of close-up views of the finished product from different perspectives:


Happy Mapping!
303-530-4976